
In this article, we are going to learn how to implement Authentication and Authorization for our Node server. In the first part, we will try to understand the basic definition of authentication and authorization.
Introduction
Firstly, we will try to understand what does mean by authentication. Authentication means to recognize the proper user should enter the system or any infrastructure which have any sensitive data. A basic example is Facebook login; we enter our credentials consist of usernames and passwords. If we have entered the correct credentials, we can login to our system. There are different types of authentication processes. Following are some of the authentication process
1. Password-based authentication. (simple authentication based on the username and password)
2. Multi-factor authentication (Based on some code generated such as PIN, OTP, etc.)
3. Biometric authentication (Such as retina based, FingerPrint scanners, face-based recognization, etc.)
4.Token-based authentication (Many companies use this type of authentication to login into there system. These token are mainly time-based they will expire after a specific time)
5. Certificate-based authentication( Digital certificate to enter to the system)
There are many more types of authentication, but these are all basic fundamental types of login.
Now we will try to understand the meaning of authorization.
Authorization is the mechanism to determine the access level of the user. The type of action user can act depending on the status of the privileges to that user.
For example, an accountant will only allow checking the finance part. Admin has access to fit all the operations into the system.
IMPLEMENTATION OF AUTHENTICATION AND AUTHORIZATION IN NODE.JS
We will make an API using that new user registration can be done. Based on the user result will show. For example, I have created a user that has a role user. Based on that role we will output the result. If the user has a role admin the output will be different.
For that we will also use JWT(JSON web token). Following are the dependencies
- express — web framework
- joi — validation function
- Config — Used to retrieve jwtPrivateKey
- mongoose — create models and schema (We will use MongoDB online server)
- jsonwebtoken — generate and verify JWT
- bcrypt — hashing the password to store in the database
Step 1 :
First, We will create the folder for the project
mkdir nodejs-authenticationAuth
cd nodejs-authenticationAuth
npm init --yes
After creating the folder, we will initialize the project by using npm init. These are our folder structure for the project
-- config
--- default.json
-- middleware
--- authentication.js
-- models
--- user.js
-- routes
--- user.js
-- index.js
-- package-lock.json
-- package.json
Step 2 :
In this section, we will create a model for the user. We will define the schema for the user that we are storing in our database. The schema consists of name, email, password, city, and isAdmin.
We have also added a function that will generate the JWT token for the login user. One more function we have added that will validate the schema. For this, we have added one npm module, Joi, which will use to validate the data we have provided.
In model, we can see that for email, we have added this validation “email: Joi.string().min(10).max(60).required().email()“. It means an email should be in string format, having a minimum length of 10 and a maximum of 60. Email is a compulsory field. Like this, we have added for others also like password, city, name, and isAdmin.
const config = require('config');
// A json web token is essentially a long encoded text string. composed of three smaller parts
// 1 .header 2. Payload or body 3. signature
const jwt = require('jsonwebtoken');
// The most powerful schema description language and data validator for JavaScript.
const Joi = require('joi');
//mongoose to connect to the MongoDb
const mongoose = require('mongoose');

// simple Schema
const UserSchemaInfo = new mongoose.Schema({
    name: {
        type: String,
        required: true,
        minlength: 4,
        maxlength: 60
    },
    email: {
        type: String,
        required: true,
        minlength: 6,
        maxlength:255,
        unique: true
    },
    password: {
        type: String,
        required: true,
        minlength: 6,
        maxlength:100
    },
    city: {
        type: String,
        minlength: 6,
        maxlength:100
    },
    isAdmin: {
        type: Boolean,
        required: true
    }
});

// generate the auth token by using the private key
UserSchemaInfo.methods.genAuthToken = function(){
    const token = jwt.sign({_id:this._id, isAdmin: this.isAdmin}, config.get('defaultKey'));
    return token;
};

const Userinfo = mongoose.model('User', UserSchemaInfo);


// function to validate the user that all required information is there or not.
function validateUserInfo(user){
    const userSchema = Joi.object({
        name: Joi.string().min(4).max(60).required(),
        email: Joi.string().min(4).max(60).required().email(),
        password: Joi.string().min(6).max(255).required(),
        city: Joi.string().min(6).max(100),
        isAdmin: Joi.boolean().required()
    });

    return userSchema.validate(user);
};

exports.UserInfo = Userinfo;
exports.validate = validateUserInfo;
Step 3:
In this step, we will add middleware. In the previous post, we have discussed the middleware. If you want to read more about middleware, you can visit this URL.
This section will create a function in which we will check that provided JWT is valid or invalid JWT. If the JWT is not right, we will throw the error.
const jwt = require('jsonwebtoken');
const config = require('config');

module.exports = function(req,res, next) {
    // check the token from the header
    const token = req.headers["x-access-token"] || req.headers['authorization'];

    // if there is no auth token  response

    if(!token) return res.status(401).send("Access denied. No token Provided");

    try {
        // if can verify the token set req.user and pass to next middleware
        const decoded = jwt.verify(token, config.get("defaultKey"));
        req.user = decoded;
        next();
    } catch (error) {
        res.status(400).send("invalid Token");
    }
}
Step 3:
In this section, we will discuss the different routes available for the user. Below are the routes for the user
- Create User
- Authenticate the user
- Check user type
In the first function, we are creating the user in which we will first validate the schema. After that, we will check that the user exists or not.
In the second function, we will authenticate the user with the provided credential. First, we will find the user with email after getting the result we will check the password using “bcrypt” module functionality.
In the third function, first, we will check that the proper token is provided or not after that, depending upon the user, we will respond to the user.
const express = require('express');
const router = express.Router();
const isLogin = require("../middleware/authentication");
const bycrypt = require("bcrypt");
const {UserInfo, validate} = require("../model/user");

// get detail of the by the towken
router.get('/currentUser', isLogin, async(req,res) => {
    const user = await UserInfo.findById(req.user._id).select("-password");
    let returnMessage = {
        user : user
    };
    if(user.isAdmin){
        returnMessage.message = 'User is Admin and it can perform Admin Activity';
    }else{
        returnMessage.message = 'User is basic User';
    }
    res.send(returnMessage);
});

// routes for the authenticating the user

router.post('/authenticateUser', async(req,res) => {
    const user = await UserInfo.findOne({ email: req.body.email});
    bycrypt.compare(req.body.password, user.password, function(err, result) {
        const token = user.genAuthToken();
        var message = {
            user: user
        };
        if(result){
            message.token = token;
            return res.status(200).send(message);
        }else{
            return res.status(200).send('Please check your credential');
        }
    });
});

// routes for creating the user
router.post('/', async (req, res) => {
    const error = validate(req.body);
    if(error.error) return res.status(400).send(error.error.details[0].message);

    // find if the user exist already
    let user = await UserInfo.findOne({email: req.body.email});
    if (user) return res.status(400).send("user already exist");

    user = new UserInfo({
        name:req.body.name,
        email:req.body.email,
        password:req.body.password,
        city:req.body.city,
        isAdmin:req.body.isAdmin
    });

    user.password = await bycrypt.hash(user.password, 20);

    await user.save();

    const token = user.genAuthToken();
    res.header("x-auth-token", token).send({
        _id:user._id,
        name: user.name,
        email:user.email
    });
})

module.exports = router;
Step 4:
In this section, try to understand the index.js file. It is our entrance file for the application. In this file, we have connected to our database for storing the user information. In this I have used my connection string to connect to the mongoDb database.
const express = require("express");
const config = require("config");
const mongoose = require("mongoose");
const userRouteInfo = require("./routes/user");
const port = process.env.PORT || 9001;

const app = express();

// config file to check the default key exist or not
if(!config.get("defaultKey")){
    process.exit(1);
};

//connection to the moongoose
const connection_url = 'mongodb+srv://admin:Sp4Essssssssssssg65gmdAZPjU@cluster0.qutfh.mongodb.net/userData?retryWrites=true&w=majority'
mongoose.connect(connection_url, {
    useCreateIndex:true,
    useNewUrlParser: true,
    useUnifiedTopology: true
}).then(() => console.log('connected to MongoDb'))
.catch(err => console.error("could not connect to mongodb"));

app.use(express.json());

// adding the route
app.use("/api/users", userRouteInfo);

app.listen(port, () =>
    console.log(`listening on port ${port}`));
Step 5:
It is our final step in this we will first run our application by using
node index.jsAfter properly connection it will output like this in the command line
listening on port 9001
connected to MongoDb
Firstly we will try our user registration part
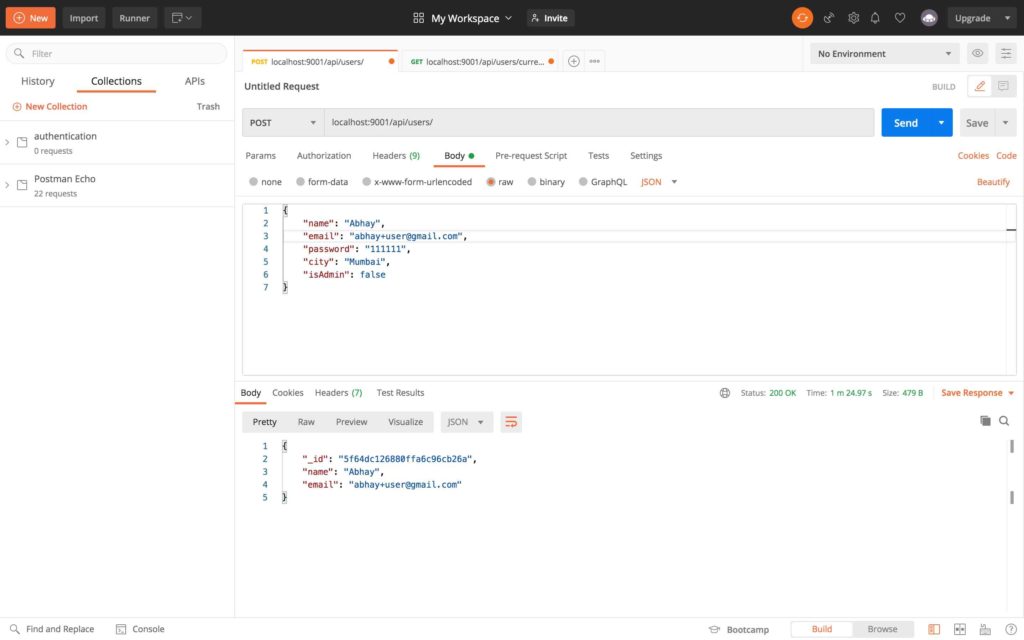
User authentication screen

After successful authentication user will respond with the user information and the generated token. By using the token provided, we can access our next route that is getting login details


Conclusion
In this article, we have learned the basic approach to creating the authentication process by using JWT. In our JWT token, we have used user_id. We can provide any useful information. We have learned how to secure our routes and to authenticate the user.